Signature Field Types & Settings
Overview
This guide covers the different signature field types available when preparing a document for signature in Pivott, as well as how to adjust field settings. You'll see these options in the second step of the process, after selecting your document and at least one recipient.
For full instructions on sending a document for signature, refer to our How to Send Documents for Signature help doc.
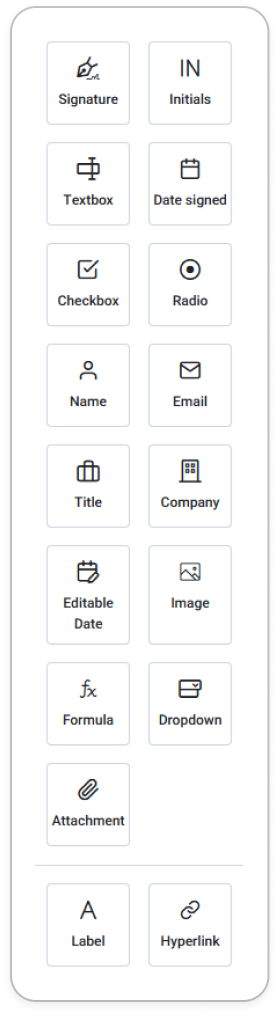
Field Types
You can add as many or as few fields as needed. Field options appear in Step 2, after you've selected a document and at least one recipient.
|
Signature
- Choose from an auto-generated style
- Draw using a mouse or stylus
- Upload an image of your signature
Initials
- Works like the Signature field; allows users to add their initials
Textbox
- Hint Text (Optional)
- Default Text (Optional)
Date signed
- Automatically filled
- Not editable
Editable Date
- User must select a date manually
Checkbox
- Required by default
- Can trigger conditional visibility for other fields (contact Pivott support for help)
Radio
- Add multiple options
- Each button must include a label
Name
- Auto-filled based on the recipient
- Only needs to be entered once; the rest of the document will auto-fill
Email
- Auto-filled based on the recipient
Title
- Auto-filled based on the recipient
- Only needs to be entered once; the rest of the document will auto-fill
Company
- Only needs to be entered once; the rest of the document will auto-fill
Image
- Upload images like scanned signatures or photos
Dropdown
- Good alternative to radio buttons when space is limited (e.g., selecting a State)
Attachment
- Allows the signer to upload a file (e.g., W9, scope of work, certificate).
- Only available if In-Person Signing is disabled
Label
- Required for radio buttons
- Useful for providing extra context anywhere
Hyperlink
|
Keyboard Shortcuts
| Action |
Shortcut |
| Cut |
Ctrl + X |
| Copy |
Ctrl + C |
| Paste |
Ctrl + V |
| Delete |
Delete |
| Duplicate |
Ctrl + D |
| Select all |
Ctrl + A |
| Clone and drag |
Alt + Drag |
| Move fields |
← → ↑ ↓ |
| Move to the next field |
Tab |
| Move to the previous field |
Shift + Tab |
| Start editing |
Enter |
| End editing |
Esc |
Field Settings
Click any field to view its settings on the right side of the page.

|
Assigned to
- Select the person who will complete this field
Required
- The field must be filled out; it can’t be left blank
Read Only
- Fill the field before sending, then lock it to prevent edits
ID
- Give the field a meaningful name for data export purposes
Default text
- Useful in templates or when suggesting a sample response to the signer
Hint text
- Provide formatting guidance (e.g., "CA", "TX", "FL")
Data Sync Tag
- Use to auto-fill repeated fields. For example, assign all "Property Name" fields the same tag (e.g.,
propertyname ). Fill one, and the rest will update automatically
Position
- Fine-tune the field’s placement on the form
Tab Index
- Controls tab order. By default, it's top-down and left-to-right—change with caution
Font
- Editable. To keep things consistent, copy/paste custom-styled fields
Resize type
- Prevents long responses from overflowing. Helpful in tight spaces
Validation
- Restrict input types (e.g., numbers only). For advanced rules (like RegEx), contact Pivott support or use AI assistance
|

